
Finally you've got a new home...
Friday, April 2, 2010


Friday, December 18, 2009
Dafont in your pocket ;)
Dear Diary,
I am really excited about my new app...
The entire Dafont database on your iPhone!!!
-------------------------------------------------------
FinDaFont
--------
All the fonts that you'll ever need, right just in your iPhone !!!
Have you ever wished to see your logo or message written with several fonts to decide which one fits best (and all that while you're on the go)?
Well... good news !
FinDaFont, lets you search the entire Dafont (www.dafont.com) database (which is really awesome!), browse through its categories, preview fonts with your own custom message, bookmark them and even send them by email wherever you wish!
* FinDaFont is actually the ONLY app in the store right now that enables the user to preview fonts that are not installed in the iPhone!
Features in this version
------------------
- Entire Dafont database ready for searching - Custom text for font previews - Bookmarking of selected fonts for future use
- Send any font by email (with preview image and zipped font files) without leaving the app
NOTE: -----
- Internet connection required to use the app (edge/3G/WiFi) - Please use only latin characters for custom text [this is a limitation of Dafont actually] Many thanks to Rodolphe from Dafont.com for his great site !
Screenshots:


iTunes link: FinDaFont
Watch the demo !
Wednesday, November 18, 2009
Diary's first iPhone App - Check it out
Dear Diary,
The first iPhone app is on the store finally :)

VA.acoustics Toolbox -----------------
This application is a set of tools for audio engineers / audio hobbyists. Consists of 3 high-quality tools:
1. Harmonics Calculator
With this tool the user is able to calculate the fundamental/1st/2nd/3d Harmonics for a given room. This is extremely helpful in case that room resonance and static Harmonics must be taken into account for a set-up. Room can be specified in Meters or Feet.
2. Tempo Finder
Tempo Finder is a precise instrument for calculating the tempo of a musical piece, just by tapping along. The tool also indicates the actual musical term for current tempo.
3. Delay Calculator
The Delay calculator of this toolbox, lets the user set a tempo and then calculates the correct delay values (in seconds) for the following intervals: -Fourth notes -Eighth notes -Sixteenth notes -Dotted Fourth notes -Dotted Eighth notes -Dotted Sixteenth notes -Fourth Triplets -Eighth Triplets -Sixteenth Triplets Is the perfect tool for setting the studio delay units with razor-sharp precision.


You can purchase it on the AppStore here: VA.acoustics
Tuesday, August 25, 2009
Photoshop "magic" - WTF !!!??
Something really weird just happened...
I wanted to design some icons for representing bank notes (euros), so I thought that would be a good idea to find some images of them on the web and use them as templates.
But this is when it starts to feel that Adobe's guys have put some kind of hocus-pocus code into Photosop...
Here is the screenshot I got...

Scary stuff...
Ps. @any-wise-guy---> The banknote image was screencaptured from a website that provided its thumbnail in flash form... so... not a chance to have embedded information in it ;)
Thursday, June 4, 2009
Monkey Island is BACK !!!
Dear Diary,
This is extremely good news !
Monkey Island is officially back again !
After so many years, with all these fans screaming for a new game, finally LucasArts decided to do something about it.
So, these guys prepare a remake of the original Monkey Island game (which is an all-time favorite for all of us I believe).
Some of key features :
- Full high definition hand drawn graphics
- 'oice o'er (voice over for the whole game :P)
- Remastered music score. Live instruments.
- Enhanced gameplay, hints for puzzles and more...

Visit LucasArts website for more info here
The second surprise is that TellTale games (with Lucas's blessings) is actually preparing... 5 more episodes of genuine Monkey Island action !!!

Visit the site here
And all this is going to be started very very soon....
Wednesday, May 13, 2009
TED Milestone - Subtitles
Dear Diary,
Coincidences sometimes are amazing....
Some weeks ago, I sent a comment to TED proposing that TEDsters all over the world could be contribute to help translate these amazing talks.
Although I didn't receive a response from the team (I can understand why :P ) I was extremely happy to see that TED is finally going this way !
I believe that subtitles will definitely help to spread the ideas...
Well done TED!
Wednesday, April 29, 2009
Automate this...
Dear Diary,
Since I am uploading many vector files to Shutterstock, I came up with an automated solution for creating the 500px thumbnails that you have to upload along with the vector file.
Is a simple automator application for Mac OSX.
Just drag your files on the application, and then a folder will be created on your desktop with the thumbnails on it !
I hope it will be useful to some of you out there :)
Download it by pressing here
Tuesday, April 21, 2009
Thursday, April 9, 2009
How Benjamin Button Got His Face
Dear Diary,
Is very rare to see such a major innovation on visual effects, since we are all used to see state-of-the-art special effects in almost every major film nowadays. But this one is different. So different as "The Curious Case of Benjamin Button" is itself.
I couldn't believe my ears when CGI-Guru Ed Ulbrich during his speech on TED, stated that "Benjamin's face in the first 30 minutes of the film is totally computer generated"... I mean, everyone in the field knows that a convincing 3D human face is considered as the "Holly Grail" of motion graphics! How did they do it then!?
The general idea that these folks had was quite straight forward... when you have to nail like a million spikes and the greatest tool available around is the stone... then go invent the hammer.
No more words for this marvelous presentation... Enjoy!
Tuesday, April 7, 2009
To post or not to post...
I am currently thinking about making some tutorials for Photoshop / Illistrator / Cinema4D and automations for Mac OSX.
So I thought of asking you first...
Please leave a comment here in case you need some specific one (for example: How to make these shiny good-looking web 2.0 buttons etc.)
Sunday, April 5, 2009
Finally... an alternative browser to do the job !
Dear Diary,
Yesterday while I was stumbling through some mac-related websites, I came across an application called "Stainless".
So, what's so special about it?
As far as I know is the only web browser that supports session-aware bookmarks and parallel sessions. Practically, this means that you can actually have multiple tabs for the same service using different credentials (for example, you can have 2-3, or as many gmail boxes you wish, open at the same time, each one for a different e-mail account). As for bookmarks, you can have for example a bookmark pointing to your facebook and another one pointing to your girlfriend's facebook (of course in logged-in mode), if you use the same machine.
For me, it's a lifesaver because it means that I don't have to log out anymore from my personal gmail account just to check my work's info_something@gmail.com one.
Furthermore, it's free and very very light and responsive.
Definitely worth having it on your mac.
You can download it here
Monday, March 23, 2009
Jennifer Lin - Piano Improvisation from a 14-year-old girl
Dear Diary,
Another miraculous performance straight from TED.
This time a 14-year-old girl (Jennifer Lin), with a jaw dropping performance.
Enjoy...
Thursday, March 19, 2009
The Awful Truth Part II
Dear Diary,
My second attempt was a bit tricky...
I wanted to investigate, wether you can get area-light soft reflections on a reflective/transparent object, with everyday equipment...
Here are the results...
{ f14 - 90mm - 30" } { shot in total darkness / no ambient light }

Unlike my previous post, I have post-processed the final image a little bit in Photoshop (straighten, vignette, noise reduction, white balance, gradient filter, saturation and some minor brush adjustments to increase contrast)
Of course the image itself is not anything special, but what I realised (once more) is that you do not need all this super-equipment in order to take good looking pictures. More experimentation of course can always push the results on a higher level of quality.
The original out-of-the-camera image:

And of course... The Auful Truth behind it :

Ps. Here, an iPhone used to provide the main soft white light & reflection, a mini reading light used to provide a circular gradient of back-light in order to create the black outlines of the sides of the bottle and the old cellphone used as a fill light (i used it to "light-paint" the left side while the shutter was open for the whole 30 seconds)
Wednesday, March 11, 2009
The Awful Truth
Dear Diary
The other day I was wondering of a way to express creativity by minimal resources.
So, I grabbed my camera and I started to explore such ways...
Problem : How to cast a soft-light to a small object, in less than 5 minutes, by using only one light source, your camera and a tripod.
Note: I have used a Nikon D300 for the shooting. ISO 200. Focal length 200mm. Exposure info provided for every snap.

F36 - 15" (white light on the right side)

F5.6 - 2" (white light on the right side)

F36 - 6" (white backlight)

F36 - 30" (blue light on the right side)

F36 - 20" (blue backlight)

F36 - 30" (blue light on the right side)
And the awful truth...

So, obviously in my case the solution to the problem was an iPhone casting the light (there are several free "flashlight" apps that let you set color and even intensity of the light)
That's all for now...
I have to wash some dishes I guess :P
Tuesday, March 10, 2009
Siftables - What an awesome idea !
Dear Diary,
There are times you think "Oh... well I don't think that technology is going to amaze me any more... I mean, ok there are plenty of nice gadgets out there but nothing really SPECIAL"
Of course I am wrong... and I know I am wrong when I see people like David Merrill (MIT graduate) doing serious job on real INNOVATION
Since my birthday is on 12th of the month, this is what I would like for a present :P
A mighty Siftable !!!
Enjoy
Ps. Seriously, these guys are doing a great job and proving for once more that Simple is Beautiful
Saturday, March 7, 2009
Microstock Sites - Earn money by doing your hobby
Dear Diary,
Two years ago was the time that I heard about the so-called microstock sites and decided to give them a try...
Although I became a member on these sites, I didn't submit any serious work to them until last December. So, here is my feedback on this issue...
(Obviously this article is for people that have as a hobby (or profession... why not) photography or vector / 3D design)
For those who are not familiar with the term, microstock sites are agencies that sell your photos/graphics to their well-established buyer communities. There are 4 major ones and dozens of new that trying to get on the game. Usually, the contributor gets a percentage of the sale (50% max) but this varies on each agency. Membership is absolutely free and you get paid by check or paypal.
Let's see them one by one and examine the income possibilities :
1. Shutterstock
Ok. This is the King of microstock for many, many users. The main reason is that you begin to sell almost immediately after uploading your files. Though, shutterstock uses a very different scheme for its sales. For every file that you sell, you get 25 cents. Ok I know what you think... How on earth I am going to earn a decent monthly income by 25c sells? Believe me, if the files are good they sell like CRAZY there :)
My experience with Shutterstock is that is the best site to begin with. They are not so picky as other agencies, they have very fast reviews (especially for vectors) and you can do serious sales out of the box.
The procedure is fairly simple. Click on the link in the beggining of the paragraph to go to the "submitters" part of the site. Create an account by filling all required info. After that, they ask you to submit 10 images of yours just to check if your work is suited for what they sell (don't worry I said they are not too picky). Now, if 7 or more of your files being accepted, they are immediately available for sale :)
A couple of notes that will save you time :
- Photos must be rgb, jpg, 4MP minimum
- Vector standard for all sites (although some accept several types more) is .eps version 8. Do not use any transparency on your work or effects like shadows - create these effects with gradients, gradient meshes and blends - to avoid rejection
- You must submit an rgb, jpg preview of your vector resized 500px on its maximum side, with the same name as the .eps file (for example my_masterpiece.eps & my_masterpiece.jpg)
- You can also submit footage or motion graphics if you like. They accept every major format.
I do really recommend you to start with Shutterstock and I would love to see your comments to hear how it is going for you :)
2. Dreamstime
Dreamstime is my second favourite. They have a very user-friendly interface, they are not so picky as well and you can have decent sales. The prices that you sell are depending on the image size that is being downloaded and the number of total downloads for each image (your files gain "levels" as they sell through time, so you earn more money from them). Also you can set a price yourself if you choose to have the option to sell the rights of an image (min 350$). They offer a lot of options such as file exclusivity (so you upload the file exclusively on Dreamstime and you get a better percentage over sale) etc. Feel free to visit their forum and read the FAQ for details.
3. iStockphoto 
(First of all if you click the button to sign up you get to my portfolio on iStock, sorry but they have it as default. If you signup though through the button you get 10 free credits :) )
iStock is a complicated case... Either you hate it or you love it. The guys there are VERY picky, but they maintain a good overall quality and as many users report the income through iStock may be really really good if your work is compatible with their standards. They also support vectors, audio and video. You submit 3 files for initial inspection and all of them have to be accepted to get started. Also, they will need a scanned copy of your ID/Passport for a valid application. Since my portfolio is pretty small there, I guess that I can not help you very much on this one :)
I would also love to hear your comments.
4. Fotolia
Fotolia gains ground lately and you can also make good sales there. Also they are selling pretty good in Europe too and offer payments in Euros for European contributors (something that other agencies do not).
Simple and friendly site. Main difference is that they require .svg files for vectors (SUPER tip: ALWAYS draw a white rectangle as background -below all layers-. Otherwise your thumbnails will look terrible (aliasing issues) ;) )
I hope that this article will help some people to get started with microstock.
If you have any questions on this please throw me a comment or an e-mail.
I can assure you that with some decent work, your hobby is going to pay you back and just to have an idea on the figures... in about 2 months if your portfolio grows to 100 images for example, earnings must be sufficient to buy you a 24" display, just to see your masterpieces on their full extent :D
Saturday, February 28, 2009
Rubbish Art
Dear Diary,
When I stumbled upon this I realised that great ideas may jump from nowhere.
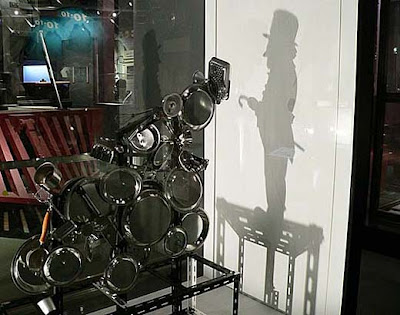
These guys (Tim Noble & Sue Webster) set up their rubbish in such way that when light aims them in a certain angle, their shadow becomes the actual artwork.
Some samples below...
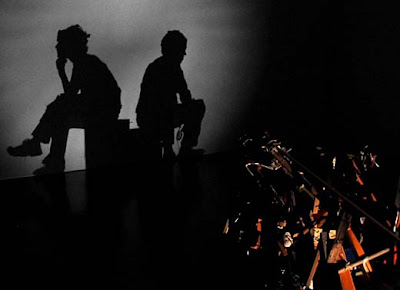

{ Tim Noble and Sue Webster, Real Life is Rubbish, 2002 | two separate piles of general household rubbish onto which a light is projected, creating a shadow self-portrait of Noble and Webster }
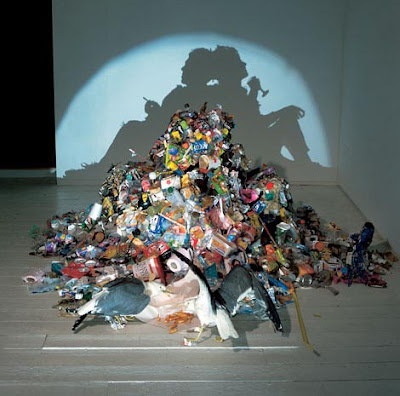
{ Tim Noble and Sue Webster, Dirty White Trash [With Gulls], 1998 | six months’ worth of the artists’ rubbish }

Tuesday, February 24, 2009
Optimizing Photoshop CS4 on Mac
Dear Diary,
I found a very interesting article posted by Yuri Arcurs the other day and I thought that might be useful to many of us...
(Ps. You can read the original article on Yuri's site by clicking here)
How to optimize the new Photoshop CS4 and how it differs from CS3 regarding performance
With the newly launched CS4 a lot of people are experiencing new problems and error messages. This is ironic because the main focus of CS4, according to Adobe, is to optimize performance and work flow.
However, a lot of the errors and problems that can occur can be fixed by using the right setting. Many of the problems are not based on CS4 Adobe programming but rather customary user habits that worked well with CS3, but not so well with CS4.
This article is about what you can do to optimize and tweak Photoshop CS4 to get the best settings to maximize performance for the high-resolution digital photographer (full frame or under).
Photoshop CS4 is different from CS3 and I have been getting too many "Out of RAM" errors to ignore this problem. At my department we work with lots of very big files (39 MP+). This requires serious computer power and even with tons of Mac power and lots of memory (RAM), sometimes things just do not move as fast as we hope for.
I just spent a weekend with my team trying to figure out Photoshop CS4 in therms of optimizing for the best possible performance for stock photography and below are the results. When we did these changes to all our computers, the result was mind-blowing. Spread this post around, because it really, really,…will help a lot of people!
 Setting scratch disks
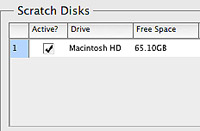
In Photoshop > Preferences > Performance > Set your scratch disk location
The main issues we had with this setting was that sometimes a computer would have less than 2 GB of free storage space available and no one noticed. Photoshop needs at least 2 GB of free hard disk space as scratch disk so make sure you always empty your trash bin and free space regularly. More often than you think you will have too little free space for Photoshop to perform well. We try to have about 10 GB of free space on all our computers at all times.
 Adjusting your Cache Levels to 8
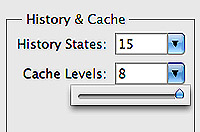
In Photoshop > Preferences > Performance > Set Cache Level to 8
Low levels are for users with low-res images with lots for layers, high numbers for users with high-res and not too many layers (below 50). For the high resolution digital photographer, a higher setting is better. For full frame shooters or photographers shooting at 16 MP+, a setting of "8" is best. Go to Photoshop > Preferences > Performance > Enter the value 8 in the Cache Levels text box. Click OK.
 Set the History States to no more then 15 states
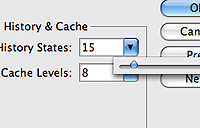
In Photoshop > Preferences > Performance > Set History States to 15
When you reduce the number of history states available, you potentially reduce the number of copies of your image filling up your memory (RAM). If you are a high resolution photographer and not a digital artist that “paints” and uses a lot of brushes in Photoshop, there really is no reason for you to have more then 15 history states. Every state is potentially a full resolution copy of your entire image that has to be stored in the cache, so even at 15 history states, this is potentially equal to having 15 images open at once. If you like to move around layers, merge layers, copy layers, liquefy, free transform, paint on masks, copy adjustment layers from one image to another, you are in danger of filling up your cache very fast. Photoshop default is 10 history states, so if you have less then 4 GB of memory, then you should stay at this setting.
 Set the Photoshop memory usage between 85-90 and not 100%
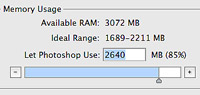
In Photoshop > Preferences > Performance > Select Photoshop Memory Usage to 85%
Counter intuitive, Photoshop needs outside memory (non-Photoshop allocated RAM) to perform some Photoshop tasks such as Free Transform, Liquefy and Content Aware Scaling. If Photoshop is set to memory usage of 100%, you risk getting the famous new CS4 error message “could not perform action… out of memory.” My workstation has 32 GB memory and I still get this message if I set the Photoshop allocation of memory to 100%. When I got CS4 I found this issue so irritating that I at one point moved back to using CS3. It took me quite a long time to figure out that what I had to do was to turn down the amount of memory allocated to Photoshop in order to free more memory. Very counter intuitive
 Deselecting Export Clipboard
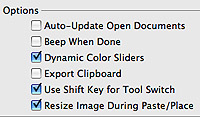
In Photoshop > Preferences > General > Deselect Export Clipboard
Unless you export a lot of copied files or clips from Photoshop to other applications there is no reason to have this function turned on. Every time you switch away from Photoshop, it stores the clipboard elements as a a PICT file, ready to use for other applications. When switching between applications with Exposé, this function creates the lag that sometimes is experienced in going from Photoshop to other applications.
 Do not have any files on your desktop
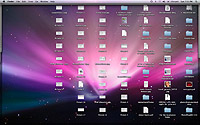
According to some Mac experts, having files and folders on your Mac desktop is equivalent to telling the Mac OS to keep these files active in memory at all time. Most people will have stacks of things on their desktop background because of comfort, but they should, according to most experienced Mac users, greatly reduce the performance of your system overall. This is a waste of cache resources, unless you really use the files on the desktop a lot.
 Don’t use 16 bit Tiffs
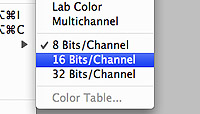
After almost two years of using 16 bit Tiffs at my department, we set up a test to determine if we where actually able to see a difference in quality. The result was interesting. No one at my department (almost ten people involved in photography), where able to distinguish 16 bit files from 8 bit files. If 16 bit files were directly compared to duplicate 8 bit files, most people where able to see slightly more color details in shadows, but none in the bright areas. If you are a stock photographer, remember that all your files are converted to jpeg, which is at 8 bit anyway.
 Save files as Tiff uncompressed without compression
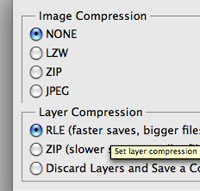
Even though I highly recommend saving Tiff files as compressed lossless, only do this as the last step. When editing pictures, whether opening or saving, never use compression. Compressing a file takes up to five to ten times longer, both opening and saving.
 Turn off Application Frame
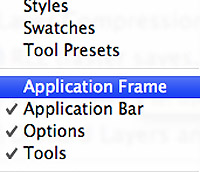
This feature is supposed to be one of the main reasons why a lot of people are getting the "Out of RAM" error. Turn it off and remember that CS4 handles multiple files differently than CS3 and therefore you cannot have as many open windows with high-resolution files as you could before. This is a little frustrating and I personally hope for an update that will fix this issue.
 Almost done
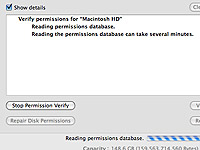
Restart Photoshop for the changes to take effect and do a little system optimizing.
Go to Application > Utilities > Disk Utility > Press Verify Disk Permissions and wait.
Go to Application > Utilities > Disk Utility > Press Repair Disk Permissions and wait.
Read this adobe article for more information.
Monday, February 23, 2009
Miguel A. Salek - A man of wonders
Dear Diary,
What can I say about this man?
One of the masters of Visual FX and the absolute Guru of ink-flowing technique...
Enjoy...
Sunday, February 22, 2009
Augmented Reality - A brave new world
Dear Diary,
Today I have stumbled upon something amazing.
The concept is pretty straightforward... mix reality with virtual-reality in real time and in such way that would be fully interactive with the average-equipped computer user (ok this is my definition anyway).
You really have to see it to believe it...
Ps. Look for related posts on youtube, some of them are really awesome
Subscribe to:
Posts (Atom)


